This guide describes how you can access the network drives outside of HWR. By connecting to the HWR VPN, you gain access to various services that otherwise only function "inside" HWR. One of these services includes the network drives for data storage (H:, I:, P:, X:).
This guide does not describe the setup of the VPN itself; please refer to the respective guide for that information!
HWR computer
On an HWR computer, the network drives (H:, I:, P:, X: ) are automatically connected if you are on the HWR network and log in to the computer with your credentials. Once these drives have been connected, you don’t need to do anything further.
If you are logged into the university network via VPN with the same computer from outside HWR, the same drives are directly available to you.
When you have finished working in the HWR VPN, remember to disconnect the connection. As long as your device is connected to a VPN network, only this network may be available to your device. This can result in not being able to use local network printers and similar devices until the VPN is disconnected again.
Drive not visible?
Personal computer
On a personal computer, the network drives must be set up once to be available for use in the VPN. First, establish the VPN connection, then follow the relevant section for your operating system.
Windows version 8 or later
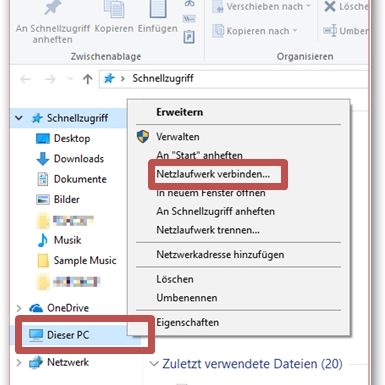
- Right-click on the entry “Computer” or “This PC” in a folder window.
- Select “Map network drive…” from the context menu.
In the following window, you can select the folder and the desired drive letter. We recommend using the same letters for the folders that are also in use at HWR (see below).
If you check “Reconnect at sign-in” or leave it checked, the drive will remain set up until you remove it using “Disconnect network drive…”. (Actual access will, of course, only work with an active VPN connection.)
Then click “Finish.” The new drive letter now exists, and the corresponding folder will open.
Overview of common drives
- Home directory (students)(H:)
\\student.hwr-berlin.de\home\your username - Home directory (employees, professors, interns, student assistants)(H:)
\\user.hwr-berlin.de\home\your username - Group drive (I:)
\\file01.hwr-berlin.de\daten
or \\file01.hwr-berlin.de\daten\department folder name
or \\file02.hwr-berlin.de\daten\department folder name - Project drive (P:)
\\file03.hwr-berlin.de\projekte - Group drive (X:)
\\hwr-berlin.de\daten
During the initial login to the network drives, you will be prompted for credentials. Use your HWR credentials with the addition “@hwr-berlin.de“.
Mac
- Now enter the desired server address.
Specific details for the individual drives at HWR can be found below.
- Then click Connect.
You will now be connected to the corresponding drive.
During your initial login to the network drives, you will be prompted for credentials. Use your HWR username with the addition “@hwr-berlin.de“.
Overview of common drives
- Home directory (students)
smb://student.hwr-berlin.de/home - Home directory (employees, professors, interns, student assistants)
smb://user/home/username - Group drive (X:)
smb://hwr-berlin.de/daten - Project drive
smb://file03.hwr-berlin.de/projekte


